Installing a DC-to-DC Charger on Your Boat
 Keep your house battery topped up with a DC-to-DC charger.
Jim Hatch
Keep your house battery topped up with a DC-to-DC charger.
Jim Hatch
A DC-to-DC charger uses excess engine-alternator current, typically redirected from the starting battery bank, to charge the house battery bank.
This can also be performed by an automatic charging relay (ACR) with a lead-acid house bank, but DC-to-DC chargers represent the best choice for marine lithium-iron-phosphate (LiFePO4) deep-cycle batteries for house banks and trolling motors. While an ACR simply parallels the starting and house batteries to share engine charging, a DC-to-DC charger converts that current to a multistage charging profile compatible with any particular battery chemistry for the best and fullest charge possible. Also, an ACR is not recommended with LiFePO4 batteries due to the high surface voltages when an engine is running or a separate AC battery charger is on.
DC-to-DC chargers are available from many brands, including Mastervolt, Minn Kota, ProMariner, Renology, Victron and others. For this project, we chose the Mac Plus 12/12-50 from Mastervolt. When configured as a DC-to-DC three-step charger, it uses 12-volt direct current from the starting bank, converts the current to a specialized charging profile, and delivers up to 50 amps of regulated voltage to a 12-volt house bank.
The Mac Plus 12/12-50 will not drain the starting bank because it charges the house bank only when the starting battery is at or above charging voltages, such as when the engine is running or a separate AC charger is on.
While the Mac Plus 12/12-50 can be set up in a number of ways, this installation connects an Optima Bluetop M27D Series dual-purpose AGM 12-volt starting battery boasting 800 cold-cranking amps with an X2Power LiFePO4 deep-cycle 31 series 12-volt battery offering 125 amp-hours, used primarily to power the electronics and livewell pump aboard our project boat. Before you get underway, make sure to disconnect all batteries, always wear personal protection equipment, and remove any metal jewelry that can create a short circuit.
Skill Level: 2 of 5
Finish Time: Approx. 6 hours
Tools and Supplies- Mastervolt Mac Plus 12/12-50 ($684.20; fisheriessupply.com)
- X2Power SLIL31-125DCM-BT 12-volt LiFePO4 battery ($1,099.99; batteriesplus.com)
- 6 AWG marine red and black cable ($2.79 per foot; westmarine.com)
- 5/16-inch tin-plated copper lug rings for 6 AWG cable ($5.70 each; delcity.net)
- (3) Blue Sea Systems 285 series thermal circuit breakers ($38.61 each; amazon.com) or equivalent fuses
- Cable cutters and strippers
- Swaging tool or soldering kit
- Adhesive-lined heat-shrink tubing
- Smartphone with X2Power Bluetooth app
- Power drill and bits
- Wrench set
- Phillips screwdriver
- Marking pencil
- Personal protection equipment
 Set the Dip Switches
Jim Hatch
Set the Dip Switches
Set the Dip Switches
Jim Hatch
Set the Dip Switches
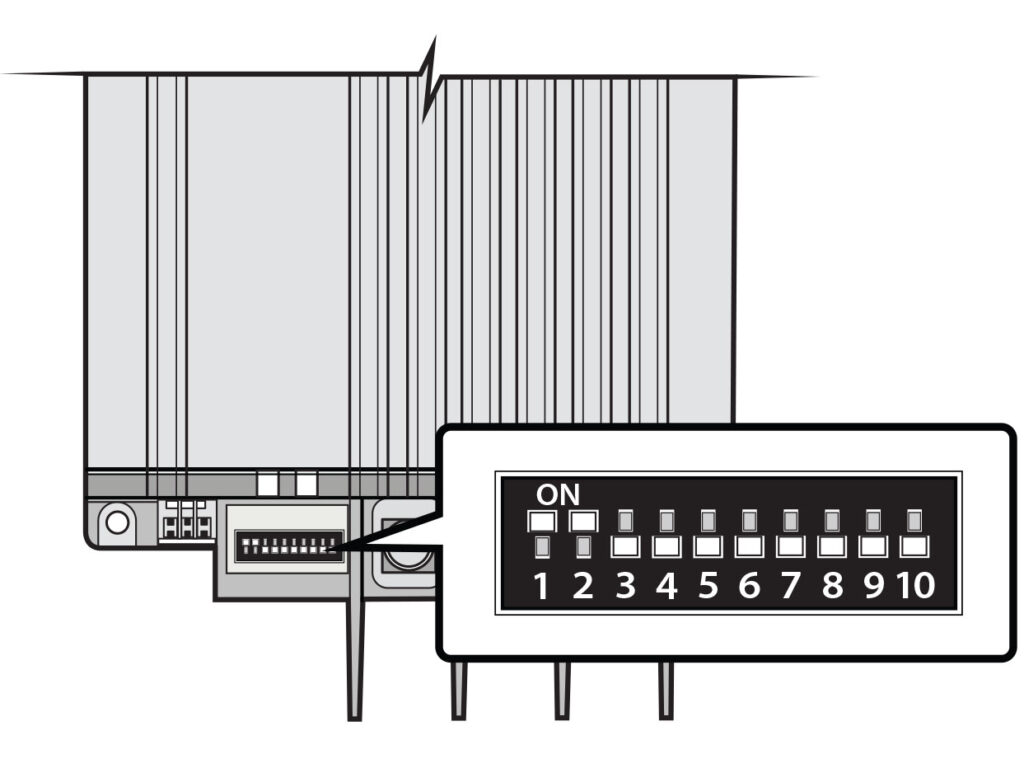
The Mac Plus 12/12-50 must be dialed in for each application, house battery type and minimum voltage for the starting bank. Use the nine DIP (dual inline package) switches on the device. Which switches are turned on or off will depend on a number of factors, such as whether you are connecting a Mastervolt battery display or CZone system to the charger. A flow chart in the owner’s manual will guide you through this procedure, so read it carefully to ensure the DIP switches are set properly for your installation.
Tip: The house battery for this installation is an X2Power SLIL31-125DCM-BT 12-volt LiFePO4 battery with Bluetooth capabilities. Using the free X2Power app and a Bluetooth connection, boaters can access a range of information, including state of charge, discharge/charge rate, and time remaining at the current discharge voltage, all on a mobile device.
 Install the Charger
Jim Hatch
Install the Charger
Install the Charger
Jim Hatch
Install the Charger
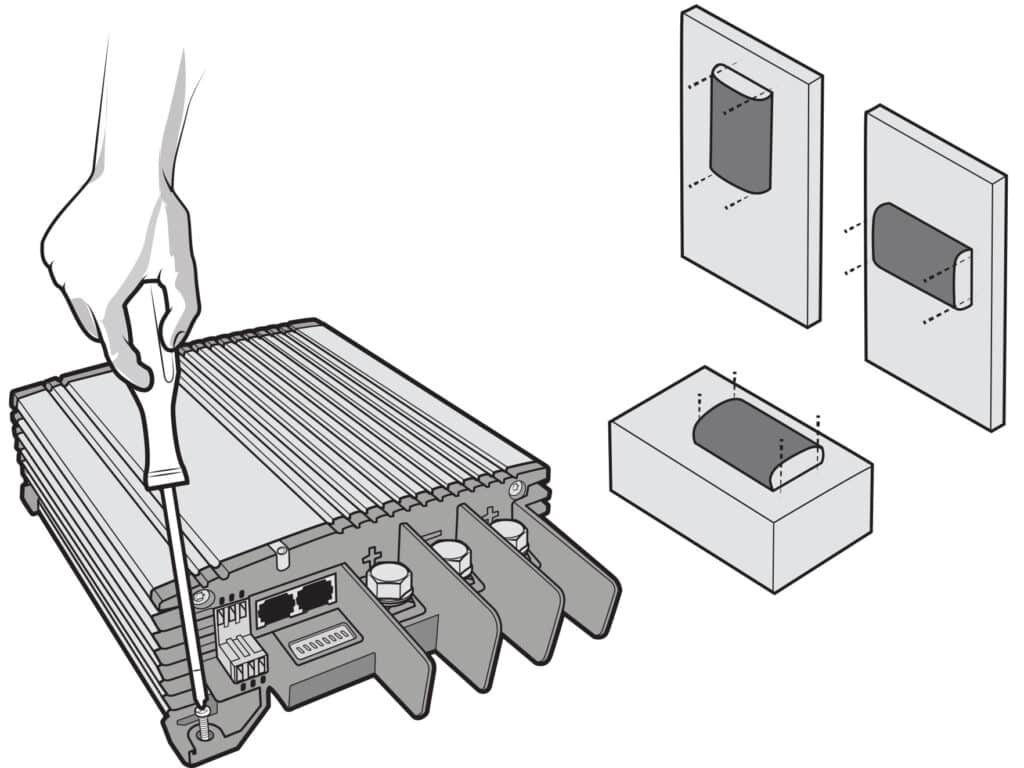
Select a location that provides for circulation to help the charger stay cool. While it has an IP23 rating, the location should be as dry as possible. The charger is not ignition-protected, so avoid an engine compartment. If using the device to charge a lead-acid battery that might release fumes, do not install the charger above it. Using four 5 mm stainless-steel screws, secure the charger to a solid and flat vertical or horizontal surface in a manner that does not obstruct airflow and provides 4 inches of clearance on each side.
 Run the Cables
Jim Hatch
Run the Cables
Run the Cables
Jim Hatch
Run the Cables
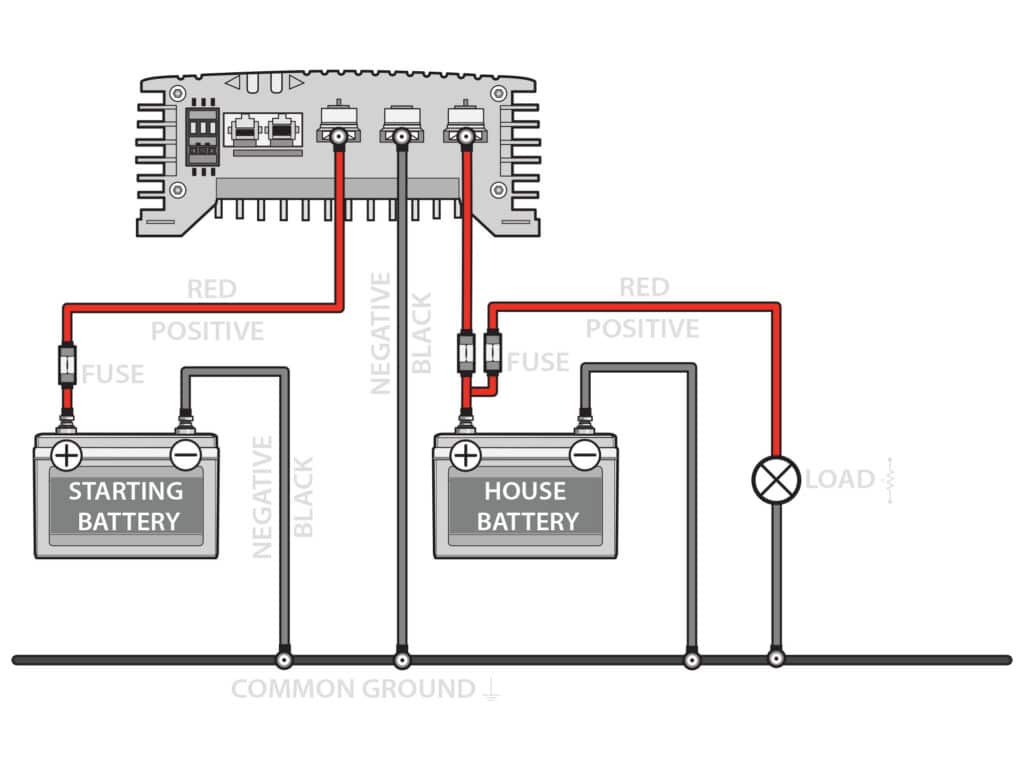
The 12/12-50 requires three cables: one positive cable from the starting bank, one positive to the house bank, and one negative to a common ground. The owner’s manual calls for 6 AWG cable. Each of the positive cables should have a fuse or circuit breaker near the respective banks. To determine the size of the fuse or breaker needed, use the Blue Sea Systems Circuit Wizard at circuitwizard.bluesea.com. For this project, we used 70-amp circuit breakers that can also serve to turn off the circuits if necessary.
 Connect the Cables
Jim Hatch
Connect the Cables
Connect the Cables
Jim Hatch
Connect the Cables
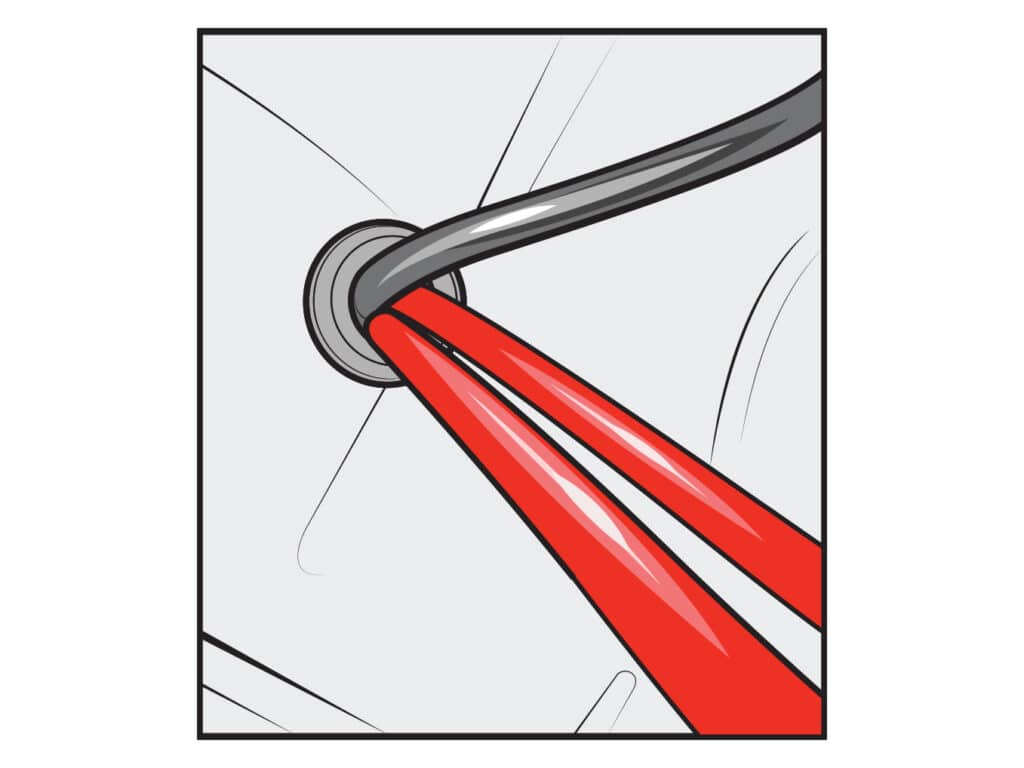
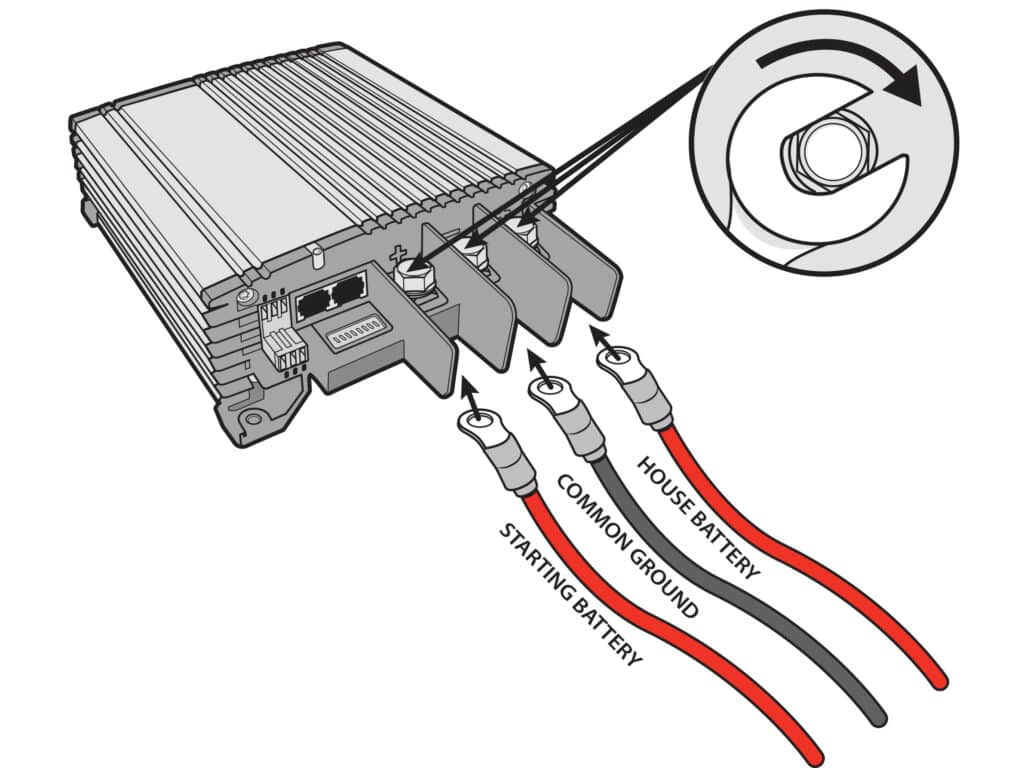
After routing the cables with chafe protection and proper support, swage or solder on a 5/16-inch tin-plated copper ring terminal on each end and use adhesive-lined heat-shrink tubing to create a waterproof seal. Leaving the circuit open, connect the cables, starting with the positive between the battery banks and charger (starting bank to the “in” terminal, house bank to the “out” terminal). Then connect the common ground cable to the negative terminal on the charger. Ensure all connections are tight and secure.
Read Next: How to Install a Wireless Marine Battery Monitor
 Test the System
Jim Hatch
Test the System
Test the System
Jim Hatch
Test the System
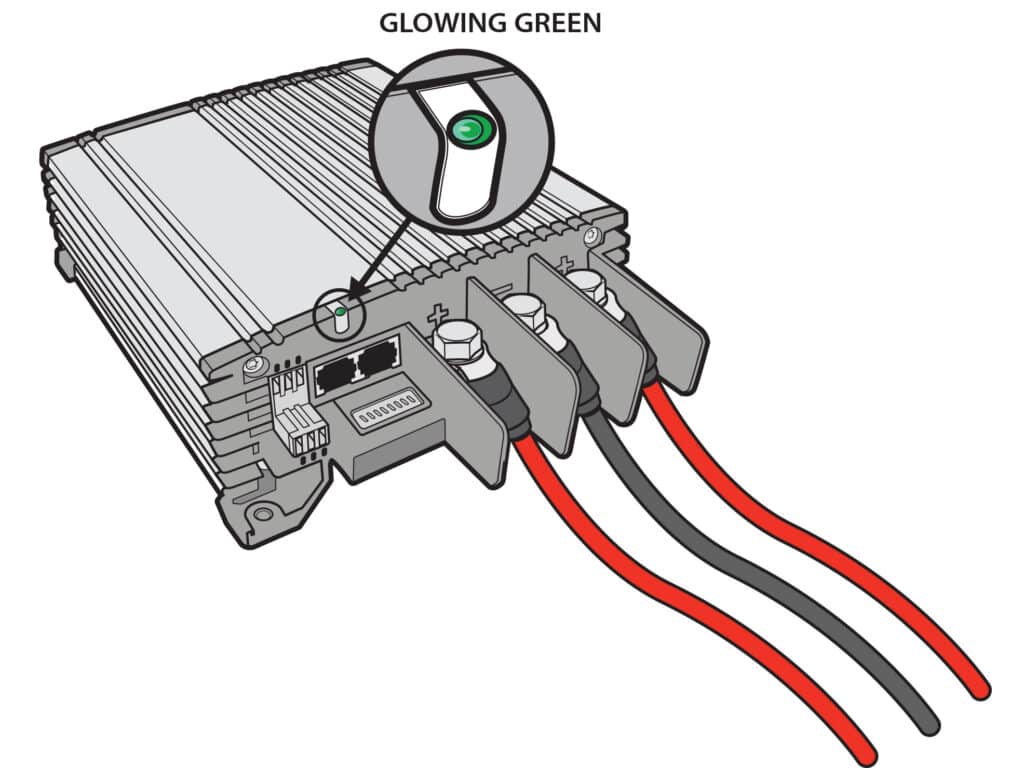
On-water testing is the best way to judge the system from idle to cruising speed. If you have a Mastervolt display as part of the installation, use it to determine how well the 12/12-50 charges the house bank. The charger also has an LED to indicate state of operation. A solid green light means it is charging normally. Solid blue indicates it is in standby mode, waiting for parameters to be met before charging. Solid red means a possible error. Check the owner’s manual to learn the meaning of other flashing color codes.
Tip: Consider adding a Mastervolt EasyView 5 battery display ($374.99; westmarine.com) to your system. It plugs into one of two MasterBus ports on the Mac Plus 12/12-50, and the touchscreen provides readouts of key parameters, such as voltage and charging current. You can also plug in a Mastervolt-CZone drop cable on the Mac Plus to access NMEA 2000 formatted data for display on an MFD.
Voltage ChoicesMastervolt Mac Plus DC-to-DC chargers are available in a range of voltage combinations. For example, the 12/48-15 model can apply three-step DC charging technology to a 36- or 48-volt house battery bank, depending on the device configuration. This makes it an attractive choice for the growing number of boating anglers using 36-volt bow-mount trolling motors. All the Mac Plus units can be configured to charge lead-acid, flooded-cell, AGM or gel batteries, and lithium batteries.
The post Installing a DC-to-DC Charger on Your Boat appeared first on Boating Mag.